Pages

Sunday 29 September 2013

Spinning... Not the bicycle type....

Last weekend I cycled off into Oxford to a wonderful little yarn shop, the Oxford Yarn Store to take part in a wool spinning workshop. It is something I've wanted to try my hand at for a while now and when my lovely sister stumbled upon this shop and its list of workshops I couldn't resist signing up as soon as I realised they were holding a spinning workshop. I think being able to spin my own yarns would fit in with my natural dyeing plan perfectly as I could dye wool, then spin it myself to create some exciting and varied wools.

It was a long day sitting in a hard wooden chair, pulling at clumps of raw sheep's fleece in an attempt to create something that looked like a ball of wool. By the end of the day I proudly carried home my very own ball of fluff that I may never knit with but will forever cherish!


The course was run by the owner of the Oxford Yarn Store and two women from the Oxford Guild of Weavers Spinners and Dyers. Their combined knowledge of spinning and many years of experience was brilliant, I don't think there was a question they couldn't answer or a technique they couldn't show us to help us with our spinning.


My lovely ball of fluff was spun with two different shades of green wool roving to add a little something else to the ball, which I'm loving. Spinning is a fairly simple concept, but really quite tricky to master so my ball of wool really is quite rustic and uneven but I think that adds to its charm!


This weekend however something rather unexpected happened.... I may have accidentally bought a spinning wheel of my very own....! It is so very beautiful, moves so smoothly and was a total bargain! I found it in a local antiques shop and realised that I couldn't pass it by without seeing if I could barter the price down a little and success! I'm now the proud owner of my very own spinning wheel!


The wonderful thing about this wheel is that it was created in my home town by a local carpenter. I really hope it will stand the test of time, and wherever I may end up in life I'll have a wonderful piece of history that connects me to my home town for ever.


Its just so beautiful! Now I just need to convince my family to buy me a sheep/alpaca or two!

Sunday 15 September 2013

Natural Dye Garden

I've been intrigued by the idea of growing my own plant dyes for some time now, since I undertook a project using natural dyes during my art foundation course in early 2012. I've read some wonderful books about natural plant dyes, growing them, using them and the slow textiles movement, and having successfully dyed fabrics with dyes sourced from the vegetable isles in supermarkets, I really wanted to start growing my own plants and ultimately making my own dyes. 

Last weekend we had our last blast of warm weather for the foreseeable future and I took the opportunity to get outside and get my garden going. As the seasons change over and autumn settles in, it was also a great time to hit up the garden centres for some bargain plant sales.


The raised planters have been built using old cement manholes stacked up on top of each other.


French Lavender


 Yellow Onions, these will be harvested for their skins as well as then being eaten!


Camomile, another plant which can be used for dyes as well as an edible source.


St Johns Wort


It'll be another year perhaps before these are ready to harvest for dye purposes and it won't be until then before they flower again but I'm already excited for this prospect! I've taken a lot of my inspiration in this field from India Flint, she has really created an amazing collection of naturally dyes textiles exploring not only colour but pattern. For me however, being a Brit, I found a lot of the plants she used aren't native to little old England and this was something I was quite interested in, whilst this book by Sasha Duerr provided some really great information and inspiration about growing your own native plant dyes, a book I would highly recommend.

Before you point it out, I'm aware French Lavender isn't native to Britain but we already have some lavender growing in our garden and I thought it would be interesting to compare the two types to see whether their colours would vary.

Wednesday 21 August 2013

Natural Dip Dye

During my art foundation course I did some research into natural dyes and ended up using it as a process in my final project. It is a process that has stayed with me and I hope in the future to grow my own plants to use as natural dye stuffs but in the mean time I use what I can easily get my hands on.

I've been planning this project for a while now but just never seem to get around to it, but today I had good enough weather to hang stuff in the garden so I got my saucepans out!


To dye this simple shirt I used powdered turmeric as it creates such a bright vivid yellow that is perfect for summer. Turmeric is a great natural dye to get hold of as it is a common spice that is already powdered which makes the dying process much quicker and simpler too. I boiled half a pan of water with about two tablespoons of turmeric powder in until it had mostly dissolved. I hung the shirt over the pan so I could dip dye the end rather than dye the whole thing.


The deep orange colour is difficult to achieve from Turmeric once dried, the top has turned much more yellow than orange after it had dried during the afternoon but I might dye it again in the future to try and get a deeper yellow/orange than bright yellow.


The great thing about using natural dyes is that the colours do change over time, exposure to the sun, wear and washing will change the colours but it just means I can re-dye it later on to create another new looking top without having to actually buy one!


I love it! I love it even more because it took about 20 minutes to dye then all I had to do was wait for it to dry!

Friday 2 August 2013

Summer Fruits

Summer holidays mean fruit picking and this year our local PYO is looking pretty good. All that sunshine we've been having and the soggy year last year seems to have provided a pretty good crop so far!

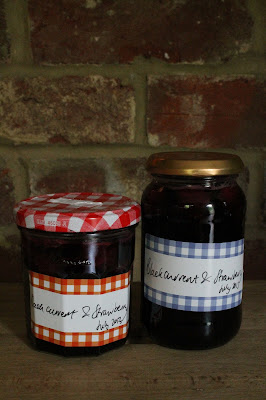
I spent a lovely hour in the late afternoon sunshine picking blackcurrants and strawberries to bring home for some summer jam making.


I picked a kilogram of each and once I'd got them home I washed them and took out all of the stems (I'll be honest I didn't pick all of the bits off the blackcurrants because I'm lazy and... someone told me it would simply add to the rustic taste....great advice!).


To make jam you need the same weight of fruit to preserving sugar and knowing I had 2kg of fruit I knew I'd need 2kg of sugar... However, when I came to weigh the fruit, just for the purposes of double checking, I didn't quite have enough... I've since heard this is a common mystery that occurs when living with other people, food just disappears....


The first step is to soften the fruit over a low heat in 125ml of lemon juice (if you're using 2kg of fruit/sugar). Once the fruit is soft and the amount of juice has more than doubled in the pan you can add the sugar. Keep stirring until all of the sugar has dissolved. Once it has, you can bring the fruit to the boil for around 15 - 20 minutes then test it to see whether it has set. If you don't have a jam thermometer there are a few other ways to test for the setting point. I recommend trying both the first time then in future you can use the one that worked the best for you. Here is a good video demonstration of the saucer test. The other method is the flake test.


I did these tests and thought my jam was set but once it had time to cool in the jar it was still a little runny. BUT TASTES AMAZING!


Jam making was actually much easier than I thought and I'm definitely going to do it again. It is so satisfying making something for yourself that you can then enjoy throughout the year (my batch made about 9 jars!) and I'm certain it tastes better than bought jam just because I made it myself!

Tuesday 30 July 2013

Crafty Project

So I've been meaning to complete this project for ages now and finally I have. I bought this printers tray from ebay ages ago now with the intention of giving it a spruce and hanging it up. Once the good weather arrived I had no excuses left as to why I couldn't go outside and paint it.


It started off life as a plain wooden printers tray but because it had some writing and pen marks all over it, that I couldn't sand off, I decided to paint it rather than varnish it.


One wall in my room is already yellow and it is just such a lovely summer colour I had to go with yellow!


Its hanging right above my bureau which I use as my desk so its a great place to store all my inspiring finds.

Wednesday 3 July 2013

Summer Tealights

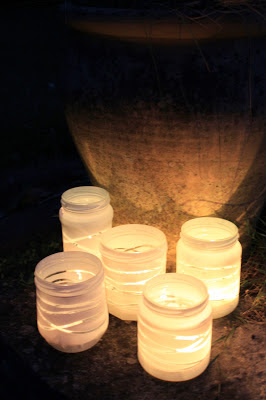
Inspired by a feature in Mollie Makes months ago I've finally professed my spray painting skills. I tried to make a few of these jam jar tea lights a while ago but they were a total mess. So in this favourable weather we've been having I took to the garden with a can of spray paint to try again.

I wrapped elastic bands around each jar in different patterns then sprayed them with paint, each jar had 2-3 coats of paint.


They were so easy to make in the end, and actually look pretty good. Once the sun sets they really do give off so much light and looked great nested around the flower pots. Definitely an easy way to use up some of those jam jars you might have lying around.

Monday 1 July 2013

50th Afternoon Tea!!

So this year my sister and I turn 50!! Well our combined ages make this delightfully round number at any rate. So we decided to do what ladies do, and we whisked ourselves off to London for the day for some sunshine, shopping and afternoon tea. It was such a wonderful day! The sun came out, it was about 27 degree so the hottest we've had so far this year, and we had the most chilled out day pretending we knew our way round London (I even gave a tourist directions, and I they were correct too!).

We decided it was vitally important that now we are grown ups, we should pretend to be so and have afternoon tea in a fancy hotel. Naturally we picked the Charlie and the Chocolate Factory themed tea and my goodness was it a good idea! The savoury side of things was so delicious, with smoked salmon on rye bread and mini leek and Stilton quiche standing out as the most yummy of the selection, but the sweets were truly exceptional!

Chocolate, chocolate and chocolate! Oh and candy floss, Eton mess, brioche, scones and milkshakes obviously.... I certainly didn't feel like a lady at the end!


Scones, Brioche and cocoa bean financier!


Pear drop and sherbet lemon candy floss, Eton mess and Caramel chocolate milkshakes!


Scones with summer berry jam and apple compote.


Caramel chocolate milk.


The big finale - Golden egg with vanilla cheesecake and mango.

This tea was a limited offer from here, but they have so many more to choose from.

Sunday 9 June 2013

Weekend craftiness...

I've finally managed to get a little crafty this weekend. I've been trying to set myself some short targets, just doing half an hour of drawing/painting/sewing a day so I don't get lazy, and to keep up my drawing skills. Today I finally played around with some lino printing and mono printing that I've been meaning to do for ages!


Logo design for a potential re-branding...! Lino printed.


Seagull bunting - mono printed


Seagull design from a previous project - mono printed.

Friday 31 May 2013

May Bank Holiday II

Sunday night saw one of the brightest moons I've seen in a very long time! Being the era of snazzy intellectual cameras, myself, my sister and my dad all went outside to take pictures, so imagine us all lying on a wall pointing our cameras out to sea precariously balanced on tiny tripods and that is a typical family moment in our household! (p.s. clicking on the pictures will bring up a slightly larger version)


 This is what we could initially see from the beach hut, but once we stepped outside it brightened instantly.


Playing around with the shutter speed of my camera started to produce even more colour in the rising moon.


 You must excuse the slight wonk on these... I was lying on my side on a wall.. enough said?


The sky to our eye was so much darker and it really is incredible what is actually out there that our eyes just can't quite pick up. It was about 10.30/11.00 at night when these pictures were taken but you'd think it was sun rise.


And a slightly straighter one for those of you who have a thing for parallel lines :)

Thursday 30 May 2013

May Bank Holiday

Now I have a normal job I actually get to enjoy the benefits of Bank Holidays!! This meant the whole family (plus two dogs) piling into the car and heading to the beach huts for the weekend and luckily enough we had the weather to go with it too. I'll brush past the fact it was pretty windy on the Monday and we were all wearing woolly jumpers, but on Sunday it was lovely, book reading/sunbathing/dog walking weather. Finally.

On a short little walk with my camera I couldn't help but be consumed by the colours I found on the beach so here is my little colour study on a British beach. The only editing these pictures have had was on the camera before taking them. I'm still learning how to use my camera so I wanted to capture the colours using only the different settings of my camera.


I have a whole other post to publish just with pictures of the moon, the skies were so clear all weekend that we had the most amazing night on Sunday the full moon was huge and so bright so there are some more pictures to come in the next few days!

I hope you all had a great bank holiday too.